First I covered the four sides with pages torn from an old text book using matt medium.
Usually I like to use PaperArtsy Fresco chalk paints, but I didn't have colours I had in mind for this project. So I used acrylic paint instead, and roughly brushed the edges with grey to create a distressed effect.
I then diluted red acrylic paint to create a translucent effect so that the text would show through once it was applied to all sides.
Next I added some random stamping, using grey Memento ink.
I then got carried away and forgot to take photos of the next stages but the following photos will show how I added an letter to each of the houses. For this I used transfers that have been in my stash for some time as it seemed a good way to use them, but of course you can also stencil or stamp letters to make the words too. Another idea I had was to paint chipboard letters, this would be a great way of using ones up that have the wrong colour or pattern.
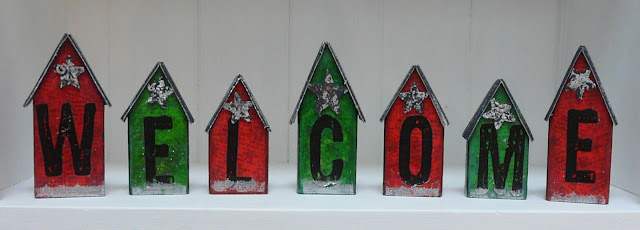
Talking of using things up.... I wanted texture on the roof of the houses and found some corrugated card. I removed the paper off one side, measured and cut strips to fit, and then painted them with grey acrylic. Once glued into position and dry, coat of matt medium helped to seal everything.
Finally I decided the houses needed a sprinkle of sparkle. Working on one area at a time I stamped small dots onto areas of the front and sides of the houses using a glue stamp pad, then sprinkled with fine glitter and let it dry.
I decided it needed a bit more, so I painted small wooden stars in dark grey acrylic. Once dry I added patches of silver embossing powder; and did the same on the bottom edge of each house and the roof, to give more lift.
And here is the finished result. The glitter does not show well in the photos but these houses will make a cheerful welcome to Christmas and to our visitors.
Here is what I used:
Wooden house shapes (see note above)
small wooden stars
Acrylic Paint in black, white, red and green
DecoArt Matt Medium
Page of text (from an old book)
Memento ink Grey Flannel
Small frost, scroll and dot stamps
Alpha transfers - but you could use a stencil or pre-cut shapes
Embossing pad
Silver embossing powder
To see more Design Team projects do pop over to TCP Blog and why not enter this months Mixed Media challenge? You'll find details how to take part and lots more ideas too.
And if you would like to know any other details about how I made the Welcome houses please leave a comment, I am happy to help where I can. Thank you for popping by and I hope you have lots of fun making your own Christmas projects.


