Showing posts with label design team. Show all posts

Sunday, 27 September 2015

STEAMPUNK DOOR HANGER - Design Team Project

I love trying new ideas and so I decided to make a door hanger for this months That Craft Place design team project. I have several Crackle Glazes in my collection, but wanted to try one by DecoArt as this is applied as a top coat rather than between layers of paint like my others.  All products used are available from That Craft Place and I will provide a supply list at the end.  


 To start I took the mdf door hanger and gave it a background coat of Nougat PaperArty Fresco Chalk paint.  I then used stencils to add further colour and detail, using Black Dress and Chocolate Pudding paints of the same range. 

 
Once dry I chose mdf shapes from the Male grab bag collection and placed the cogs and other shapes into position to create a face. I marked the position for the eyes and used a PaperArtsy stamp from my collection.  I'll take this opportunity to apologise for not taking more photos of these stages.
I got so absorbed that I forgot to pick my camera up and I know some of my friends will be shocked at this since my camera is usually in constant use!


I then painted the cogs, moustache and the arrow using the Black Dress, making sure all the visible sides were covered.  Once dry I added a coat of DecoArt Crackle Glaze on to the cogs.  I was interested to see the difference between other glazes I have used and once dry I noticed it created small cracks, which suited the size of the cog.  I brushed a thin coat of DecoArt Antiquating Cream into the cracks and removed the surplus with a damp cloth.  I left the moustache and mouth plain black to give definition. 


I glued the 'face' pieces into position using DecoArt Matt Medium.  Once dry I used the same product to cover the surface as this would provide a seal and finish.  I decided I liked the way this crackle glaze worked and I will be experimenting with other ways of using it.   As the door hangers come in packs of two I am looking forward to decorating the next one.  Maybe one for Halloween?  Talking of which, my last project was a set of wobbly haunted houses.  If you missed this there is still time to make your own!
 
SUPPLY LIST
MDF Door hanger (comes in packs of two)
MDF Male Grab Bag 
PaperArty Fresco Chalk paint in colours: nougat, chocolate pudding and black dress
DecoArt Crackle Glaze
DecoArt Antiquating Cream
Stencils
DecoArt Matt Medium
Stamp from PaperArtsy range for eyes

As mentioned all these items are available from That Craft Place
There are lots of other designs in the MDF range and a good
selection of masks and stencils, mediums and paints.
To see more Design Team projects pop over to TCP Blog and why not enter this months Mixed Media challenge?  You'll find details how to take part and lots more ideas too.  Thank you for popping by and I'll be back next month with another project. 

Sunday, 30 August 2015

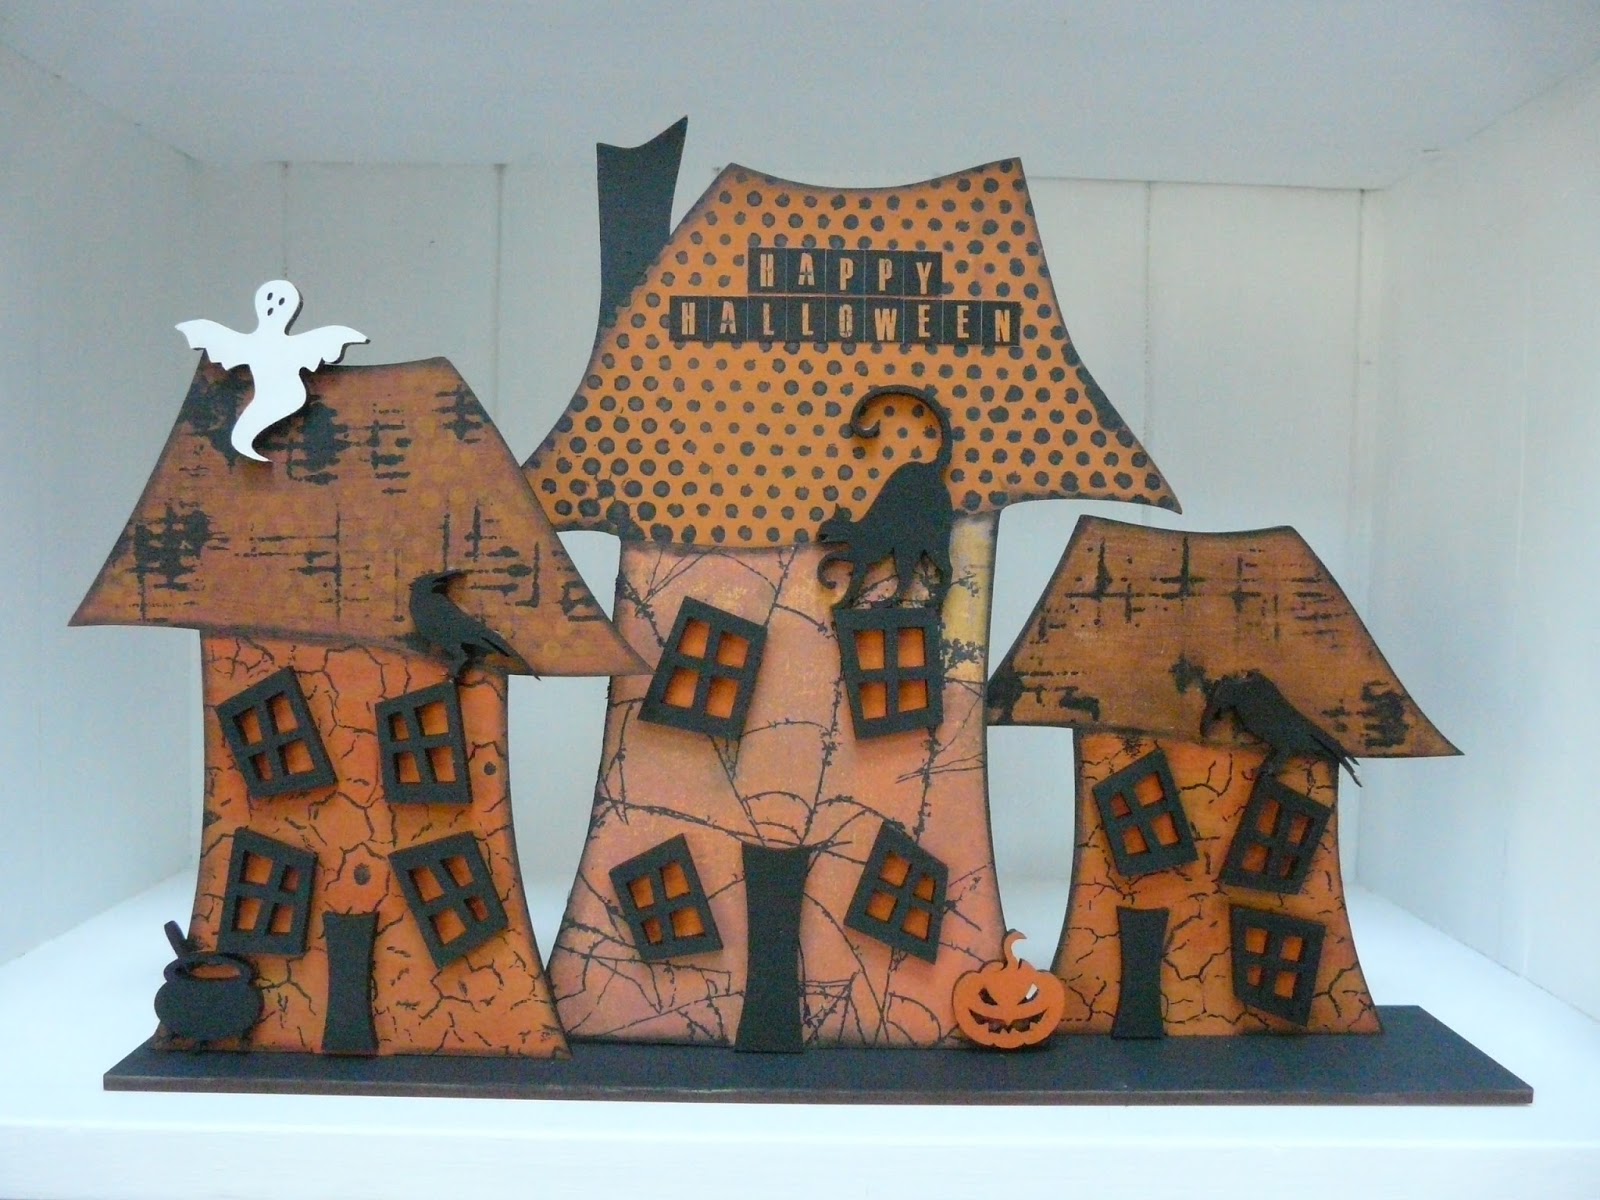
HALLOWEEN IN AUGUST - Design Team Project

I don't usually think so far ahead, let a lone prepare, but I knew what I wanted to do with these have MDF Wonky Houses from That Craft Place ever since I first saw them. 


And in case you are inspired to make these too, I decided to share these now, to give time for ordering and making up in time for Halloween.  Of course, they would also be good for other festivities such as Christmas (I can see me ordering another set of Wonky Houses!) and they would look pretty good for Easter, decorated with spring flowers and bunnies.  But in total contrast here is what I did to them:

First I gave them an overall colour of PaperArtsy Fresco Finish Chalk paint then used masks and stencils to add detail to the roof. 

Then I masked the roof and windows while I worked on the front of the house, to leave the inside window plain orange.  On the smaller houses I used a stamp to create an overall pattern, and decided to use a sheet of paper on the middle house. This sheet is from a set of Halloween papers in my stash and I've had it so long I don't know the manufacturer, but the large cobweb design was perfect for this project. 


And here are so close ups, showing more detail. After decorating the houses I inked the edges and painted the window frames and doors, using the same paint to decorate the base of the Wonky Houses and the MDF Halloween shapes (also available from That Craft Place).  Finally I attached these in place with PVA glue and gave it all a coat of DecoArt Matt Medium to seal and protect it.


And that's me done!  The houses will be packed away until the end of October and then they will have pride of place. I had a lot of fun decorating these and I hope they will enjoyed year after year. 
If you would like to make your own, here are the materials I used:

MDF Wonkey Houses
Halloween Grab Bag
PaperArtsy Fresco Finish Chalk Paints. I used Black Dress, Pumpkin Soup and Blood Orange - blending the colours to create different shades.
DecoArt Matt Medium
PVA glue
Sheet of patterned paper, alphas and stencils from my stash.

All these items are available from That Craft Place
Do check out other designs in the MDF range and their wide selection of masks and stencils.

To see more Design Team projects do pop over to TCP Blog and why not enter this months Mixed Media challenge?  You'll find details how to take part and lots more ideas too.  Thank you for popping by and I'll be back next month with another project. 
Sunday, 2 August 2015

SUMMER FRAMED - DESIGN TEAM PROJECT

For this months design team project I thought I would use a frame that came in this set.  You can see what I made with the other one here.


I have kept these MDF Seagull Scene shapes for a special project as they are one of my favourites and I wanted to use them as a focal point.  Then suddenly an idea came and I just love it when this happens!  Especially as August makes me think summer and holidays.  

I love the design of these shapes so I deliberately created a clean and uncluttered look. I planned to paint the background but when I saw my friend using her paper pad this sheet looked perfect for what I needed.  I glued this to the background, then it was a simple job of choosing paint colours to go with it, which I did by blending 3 main colours (see materials used below). Once dry I added a stamp detail on the post for effect and then glued the frame and shapes into position.  I was pleased with the overall result and hope you like it too.


The frame goes well in my bathroom so it already has a space, but I think this would also make a good book cover.  An idea for another time perhaps.  Lisa, over at That Craft Place, I need some more frames please!! 


MATERIALS USED:

MDF frames from TCP
MDF Seagull Scene shapes from TCP
Printed paper from my friends pad
PAINTS - PaperArtsy Fresco Chalk:
Colours: Black Dress, Snowflake and South Pacific
(blended to create shades I wanted for this project)
DecoArt Matt medium to seal and protect (especially useful for projects planned for bathrooms or steamy areas)
Cosmic Acrylic Glue for attaching MDF shapes
 
You can buy all the above from That Craft Place, and do check out the range of MDF as it is superior to others I have used. And if you see Creative Expressions selling these products chances are they have been made by Lisa!  

Thanks for popping by and you can see more creative ideas on the TCP facebook page.

Thursday, 26 February 2015

TAKE LIFE ONE CUP AT A TIME

I thought I would share a quick tutorial on how I decorated a laser cut tea pot and a matching coaster, and if you are interested both designs are available from THAT CRAFT PLACE, where I am a design team member.


TEAPOT:

As I have been getting messy with paint recently I thought I'd use paper for this project.  I chose a sheet from my collection of 12x12 and glued it to the tea pot leaving a small overlap which would be trimmed once the glue was dry.  I used PVA but you could use other glue of your choice.  I added a contrast paper for the lid and once the glue was dry I gently sanded the edges to remove excess paper and neaten the outline.  

I inked the edges and on this occasion I left the words untreated as I love natural wood and the colour matched the that ink I used.  To finish I sealed it with DecoArt Matt Medium, and attached the words to the teapot using fine fishing line and strong tape.  A strong glue could also be used to attach the fishing line if this is hung in heavy-used areas.


Finally I tied fishing line to the handle and the lid, so that it could be hung at an angle to give the effect of the teapot being poured.


COASTER:

I used a blank MDF coaster and coated it with paint, choosing (Guacamole)  PaperArtsy Fresco as this complimented the paper I was using. 


I also used a set of off-cut laser cut shapes to decorate the coaster.  I love thinking up different ways of using these and to add definition, so I glued a piece of matching paper with PVA and laid the wooden off-cut shapes onto it, smoothing out any air bubbles. 

 
Once the glue was dry I cut between the tiles with a sharp craft knife.


I trimmed and inked the edges of each tile, then moved them around on the coaster until I was happy with the position.  I then glued them on using Cosmic Shimmer as this is fast acting.  You could also use PVA, DecoArt medium or other glue of your choice.


To finish, I gave two coasts of DecoArt Matt Medium to seal.  I made this for decoration purposes and would add further coats of sealer if I wanted to use the coaster.


With a box of special tea bags (and a mug too if you are feeling generous!) this would make a nice handmade present Mother's Day.  
 
SUPPLIES USED:
Laser cut designs from THAT CRAFT PLACE - teapot, coaster, off-cut shapes.
Decorated papers to cover teapot and tiles
Glue - PVA or other suitable for attaching papers.
(Please note: you could use the same glue for attaching the tiles, or use Cosmic Shimmer.  There is no right or wrong, just preference and what you have available).
DecoArt Matt Medium to seal (you could also use this to glue if liked)
Ink for edging
PaperArtsy Fresco paint.
Fishing line available from angling shops
 
Thank you for popping by!!

Related Posts Plugin for WordPress, Blogger...