I have exciting news because in September I became a Laser Cut design team member for That Craft Place, in Eastbourne. It has been an exciting time and I have loved using these designs made out of MDF and chipboard and using them as a focus for my projects.
I thought I'd share my latest make and a tutorial and as I love sewing (among so many other things!) I asked Lisa if she could send me some haberdashery designs. A part from the laser cuts the materials are all up-cycled or what I had on hand, and if you use any of these ideas please do pop back and let me know as I'd love to see them. Let's start, shall we!
I made this project on a craft retreat and there is a lack of photos of the stages as I did not plan to write a tutorial at the time (I was probably too busy having fun and chatting!) But the stages are easy to describe so I'll take you through step by step:
First I took an empty box.
1. I painted the box white so that the colour did not show through. Depending on your base colour you may not need to do this. Wait for the paint to dry before you cover it.
2. I used tissue paper from a vintage sewing pattern to cover the inside and outside of the box. Diluted PVA worked well, and I applied it to the box itself as the tissue is fragile. That said, being so thin tissue is also easy to gently push into awkward corners so it is good to work with. NOTE: I worked out any wording or design that I wanted to show and cut the paper to fit. You could also add the design as a layer if you prefer. Here is the back and underside:
3. While the tissue paper dried I started to work on the laser cuts. This sewing machine fitted perfectly on top of the box and I looked at various ways I could decorate it. Paint? Stamp? Ink? In the end I decided I wanted a pattern so I chose printed paper and used the sewing machine as a template to draw the outline on the back of the paper. After I had cut it out I glued it into position using Collall. Once it was dry I added a small stamped flourish and a some words.
4. I hadn't taken any threads with me, but the great thing about being a way with friends is that someone always has what you need! So I wound embroidery silk around the bobbin and used double sided tape to secure. I then glued the sewing machine onto the lid. I used my glue gun but was too impatient to let the glue heat properly and it dried before it stuck
so I borrowed Evostick from another friend and this worked a treat.
5. I used Paper Arty chalk paints to decorate the bobbins and once dry I inked a line to add detail. I wound round more embroidery silk and used Evostick to glue the MDF to the box.
6. I painted a laser cut button and used the same small flourish to add detail. More embroidery silk was threaded through the holes to add texture and colour. I used one of my rubber stamps to make a button card and glued the button on.
7. Finally I added the safety pin and needle and thread. I love the detail of these and so I simply added a light wash of paint to define the thread. Sometimes less is more, I think.
8. I added a couple of final stamped imaged inside the box and now it is ready to post to Lisa for display in the shop.
I had great fun making this box and am working on another project that I will share once it is finished. Meanwhile if you would like to see what other laser cut designs are available why not pop over to That Craft Place and take a look?
Thanks for popping by.
Tuesday, 28 October 2014
Saturday, 11 October 2014
5 in 5 - October 2014 - MELANIE
Melanie is my friend who lives in Australia and she loves photography. Every month Melanie has taken part in this monthly neme and we managed to find a way round her not having a blog by posting here. I love that we have found a way for her to take part so once again Melanie, a big thank you, and over to you:
The
month of October has begun and another 5 in 5 shot to be taken. It is a
long weekend over here and days of being lazy and enjoying the sunshine.
Our temperatures have risen and this past week we have enjoyed temperatures in
the high twenties and low thirties. The garden is full of colour and it
was an easy option for me to walk around the garden with my camera. Top
left are marigolds. Our garden front and back has areas which are a sea
of marigolds as they self-seed and I let them go where they like. They
are in the veg plot, in the herb garden and in the front flower garden.
Bottom left is a shot of lilies. The lilies are next to our fish pond and
in a bog area near the pond, heaps of flowers and such a stunning look of white
against green. In the middle is a shot in our bottle brush tree.
This tree at the moment is covered in the scarlet red brushes that the tree
gets its name from. Top right is a shot of the blossom on our dwarf orange
tree. This tree is in a pot by the back door and the scent fills the air
by this door. The final photo is of flowers on our bird of paradise, a
front garden flower which looks its best at this time of year.
The UK is beginning to see shorter daylight hours and there is a nip in the air which also means the trees are beginning to turn. As much as I lover this time of year for its autumnal colours and offerings of fruit and harvest, these beautiful flowers Melanie has shared and the idea of sunshine and warmer weather is appealing. That said, this time of year also invites me to light my log burner and there's nothing I like more than the smell of wood smoke and snuggling indoors with a good film or book. I guess all seasons have their appeal and it is important we appreciate them so I hope you find something to enjoy, whatever the season where you are. And this reminds me that I took some beautiful photos of spider webs last week, with this months '5 in 5' in mind. I chose other photos in the end but I may just have to come back with another post for this months challenge! And if you'd like to get out your camera and share some of your photos that would be truly wonderful!!
If this has inspired you to take part in this challenge you have until 25th before the link closes. It's great fun and this post should answer any questions or give other information that you need.
Thank you to everyone else who has joined in or left comments. Links for this months posts are here and hopefully I'll be back with more photos from Melanie and myself next month. I hope you will join me!
Wednesday, 8 October 2014
JUNK JOURNAL - sharing Debs story
In previous Junk Journal posts I have made reference to one of the swap participants, Debs. Not only did I love the way she came up with her ideas but the story behind it and so I took photos of her journal and invited Debs to tell all.
So let's not waste time and with a big THANK YOU - it's over to Debs!
1. So, Sandie’s junk journal challenge, should I do it, too busy really, work and getting ready to go on holiday and on top of that having to pick up my new passport in person from Peterborough due to lost photos……..well, I combined that trip to Peterborough with holiday shopping and whilst very pleased with the clothes and cosmetics I came away from that trip totally inspired by the packaging that all the things had come in. I loved the colours and the feel of the bags, so it was straight into my stash to have the fun of looking at papers and ephemera that all of us can describe in our craft spaces. Old photo mounts, paint chips, post cards from Ikea, an old A-Z of London, an old botanical book. Although this was a junk journal and I knew some of the pages would not come back to me I still couldn’t help but think of the journal as a whole and carry the colour theme through the pages, oranges, greys and blacks inspired by the shopping bag from Taking Shape. (A brilliant shop for the slightly larger and curvaceous ladies, clothing with attitude and quality).
2. How to use the papers and bags……decide on a size, and go for it. A really useful tip that helped was to use the Ikea postcard as a template for the page size and take the postcard to the shopping bag and move it over the printed patterns and also over the folded part of the bag to see how to deconstruct the bag but keep the interesting features (technical term here now….keep the folded part in as a feature….the folded part is called the gusset!!!!)
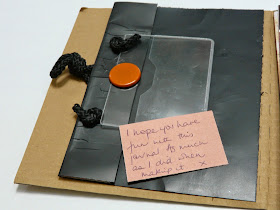
3. A page simply cut out from a No 7 gift bag leaving the black cord handles on. After the journal was finished these handles were too long so I just tied a knot into them. Onto the inside flap by the handles I attached a clear acrylic name badge holder with a brad. A place for hidden journaling.
4. Opposite this I used an old photo mount, used paint chips to add colour and then distress inks blended in to the colour theme. Ink also enhanced the slight embossing on the photo mount.
5. This page uses the shopping bag from taking shape, I even left the name on the gusset as I liked the expression. On the reverse I utilised an existing fold in the bag and tucked in an envelope and card for more hidden journaling. The card and envelope from my stash, a TKMaxx find. I also distressed inked the inside of the page but has to go really carefully as it was glossy paper and took ages to dry.
6. An Ikea postcard mounted onto a Chanel No 5 hand-out. I had used photo glue and this reacted with the glossy card giving an interesting texture in parts. Who can resist a quote “A drop of No5 and nothing else”!!!!
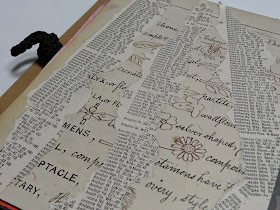
7. I always have books that I have got from charity shops or car boots that tell a story in their design, can work as personal references to friends and places, or they work as background papers. This is simply a page from a botanical book with torn strips from the London A-Z.
8. Almost the same on the reverse but instead of the street maps I used the index of street names.
9. The reverse of the Ikea post card was distress inked and a line of chandeliers stamped across the top of the page. Overlaid on the top and affixed with glossy accents is part of the packaging from Tresor perfume, you can see where the bottle fitted into the acrylic and a chandelier printed onto it.
10 . Utilising part of the taking shape shopping bag and paint chips this page was created. I even used an existing hole in the bag (where the handles had been) to add a tag. This tag was created from the label from one of the items of clothing bought for my holiday!!! I covered the name and details with a piece of coordinating card.
11. Another photo mount, left fairly plain as I liked the muddy greys and old grey writing.
12. Using the A-Z as matting and layering.
So the pages were done, and interestingly I had passed half the night being inspired by Sandie’s challenge and thinking I didn’t really have the time. Amazing where thought and inspiration can take you. So what do I do for the covers, this part is really serendipity. I looked around by craft space and of course it was cluttered, untidy and with evidence of good intentions to tidy up and sort out, i.e. Ikea cardboard cartons for packing. Way to go!!! Took my postcard template to one of the cartons, tried it out in different positions and even the existing perforations created a spine, the hand holds created a view into the journal and the lines for labelling the box fell into an ideal place on the cover. The handles from the shopping bag were used to tie the journal up and a clothes price tag covered and coordinated as an embellishment to the cover.
So thanks Sandie for this challenge.
Debs
I think you will agree that Debs certainly got her inspiration from this packaging and it was also a lesson for me. I am someone who saves interesting paper and card for projects and perhaps in future I will use what I have to hand instead, as I love the way this journal came together and the story attached.
When it came to making up the journals for the swap I had a small dilemma as Debs had gauged the size of her cover by her postcard. The instructions asked for pages up to 6 x 8 inches and this meant some of the swapped pages would be too big. I wanted to keep Debs cover so I used the back of it to extend the length and added a new back replacement. I know Debs liked the detail of this packaging, and the 'hand hold' now left space for a tab to be added for a title. I punched holes in the journal and used a thick ribbon to secure, adding the original handle from the shopping bag and tag as a detail. I hope Debs likes the result....
The journals have now been returned to the swap participants and if you took part I do hope you like your package when it arrives. And I wonder which of Debs pages you will find in your journal?!
Thanks for popping by, for taking part, and again to Debs for sharing her thoughts and ideas. It has been fun!
So let's not waste time and with a big THANK YOU - it's over to Debs!
1. So, Sandie’s junk journal challenge, should I do it, too busy really, work and getting ready to go on holiday and on top of that having to pick up my new passport in person from Peterborough due to lost photos……..well, I combined that trip to Peterborough with holiday shopping and whilst very pleased with the clothes and cosmetics I came away from that trip totally inspired by the packaging that all the things had come in. I loved the colours and the feel of the bags, so it was straight into my stash to have the fun of looking at papers and ephemera that all of us can describe in our craft spaces. Old photo mounts, paint chips, post cards from Ikea, an old A-Z of London, an old botanical book. Although this was a junk journal and I knew some of the pages would not come back to me I still couldn’t help but think of the journal as a whole and carry the colour theme through the pages, oranges, greys and blacks inspired by the shopping bag from Taking Shape. (A brilliant shop for the slightly larger and curvaceous ladies, clothing with attitude and quality).
2. How to use the papers and bags……decide on a size, and go for it. A really useful tip that helped was to use the Ikea postcard as a template for the page size and take the postcard to the shopping bag and move it over the printed patterns and also over the folded part of the bag to see how to deconstruct the bag but keep the interesting features (technical term here now….keep the folded part in as a feature….the folded part is called the gusset!!!!)
3. A page simply cut out from a No 7 gift bag leaving the black cord handles on. After the journal was finished these handles were too long so I just tied a knot into them. Onto the inside flap by the handles I attached a clear acrylic name badge holder with a brad. A place for hidden journaling.
4. Opposite this I used an old photo mount, used paint chips to add colour and then distress inks blended in to the colour theme. Ink also enhanced the slight embossing on the photo mount.
5. This page uses the shopping bag from taking shape, I even left the name on the gusset as I liked the expression. On the reverse I utilised an existing fold in the bag and tucked in an envelope and card for more hidden journaling. The card and envelope from my stash, a TKMaxx find. I also distressed inked the inside of the page but has to go really carefully as it was glossy paper and took ages to dry.
6. An Ikea postcard mounted onto a Chanel No 5 hand-out. I had used photo glue and this reacted with the glossy card giving an interesting texture in parts. Who can resist a quote “A drop of No5 and nothing else”!!!!
7. I always have books that I have got from charity shops or car boots that tell a story in their design, can work as personal references to friends and places, or they work as background papers. This is simply a page from a botanical book with torn strips from the London A-Z.
8. Almost the same on the reverse but instead of the street maps I used the index of street names.
9. The reverse of the Ikea post card was distress inked and a line of chandeliers stamped across the top of the page. Overlaid on the top and affixed with glossy accents is part of the packaging from Tresor perfume, you can see where the bottle fitted into the acrylic and a chandelier printed onto it.
10 . Utilising part of the taking shape shopping bag and paint chips this page was created. I even used an existing hole in the bag (where the handles had been) to add a tag. This tag was created from the label from one of the items of clothing bought for my holiday!!! I covered the name and details with a piece of coordinating card.
11. Another photo mount, left fairly plain as I liked the muddy greys and old grey writing.
12. Using the A-Z as matting and layering.
So the pages were done, and interestingly I had passed half the night being inspired by Sandie’s challenge and thinking I didn’t really have the time. Amazing where thought and inspiration can take you. So what do I do for the covers, this part is really serendipity. I looked around by craft space and of course it was cluttered, untidy and with evidence of good intentions to tidy up and sort out, i.e. Ikea cardboard cartons for packing. Way to go!!! Took my postcard template to one of the cartons, tried it out in different positions and even the existing perforations created a spine, the hand holds created a view into the journal and the lines for labelling the box fell into an ideal place on the cover. The handles from the shopping bag were used to tie the journal up and a clothes price tag covered and coordinated as an embellishment to the cover.
So thanks Sandie for this challenge.
Debs
I think you will agree that Debs certainly got her inspiration from this packaging and it was also a lesson for me. I am someone who saves interesting paper and card for projects and perhaps in future I will use what I have to hand instead, as I love the way this journal came together and the story attached.
When it came to making up the journals for the swap I had a small dilemma as Debs had gauged the size of her cover by her postcard. The instructions asked for pages up to 6 x 8 inches and this meant some of the swapped pages would be too big. I wanted to keep Debs cover so I used the back of it to extend the length and added a new back replacement. I know Debs liked the detail of this packaging, and the 'hand hold' now left space for a tab to be added for a title. I punched holes in the journal and used a thick ribbon to secure, adding the original handle from the shopping bag and tag as a detail. I hope Debs likes the result....
The journals have now been returned to the swap participants and if you took part I do hope you like your package when it arrives. And I wonder which of Debs pages you will find in your journal?!
Sunday, 5 October 2014
5 in 5 - October 2014 - MAKING BOOKS
Welcome to '5 in 5' where on the 5th of
each month I post 5 photos that I have
taken in 5 minutes.
I have always loved playing with paper and sharing more of what I do. My passion is for making books and so I was really excited last week to run a class at one of my favourite shops in Essex, Birds in the Barn. I used a range of Kaisercraft papers and loved the grunge colours and range of these designs but initially this also caused me a problem. You see most of my handmade books are the focus for my photos..... but what ones to include? The colours and design felt too heavy for the camping holiday with my granddaughters, and too flowery for other projects I have planned.
Then I came up with the perfect idea.... a recent visit to the Gunpowder Mills! Since this was very industrial and grey, but surrounded by a nature reserve and canals full of dragonflies, I was suddenly inspired and super excited! The book has lots of pockets and flaps and in the class it was lovely to see how everyone used the papers in different ways, because I love nothing more than throwing an idea and letting people pick it up to use in their own way. This allows everyone to make a book that feels individual rather than a copy of my example and everyone in the class seemed to enjoy themselves and go home pleased with what they made. I still need to add journaling and finishing touches to my own book, but here it is in 5 photos:
I hadn't planned to make a book using these photos but I am glad that these papers offered an invitation as I love this book and it was a memorable day worthy of recording. I wonder if you sometimes choose papers or materials then wonder how best to use them?
As for my local book making classes, these are regularly planned and I love coming up with new ideas and designs each time. I also have one special book in the making, but more about that later as this is a special surprise.
And finally, I was invited to take part in an interview about my passion for paper, so do visit Paperphilia to find out more.
As always, thank you for visiting and any comments are always warmly appreciated.
If you are inspired to get out your camera and join in the '5 in 5' photo challenge here is the plan:
1. Choose a location.
2. Have your camera ready.
3. Set a timer for 5 minutes (I use my mobile phone).
4. Take as many photos you can until the time is up.
5. Choose 5 photos to download and share by using the link tool below.
You have until the 25th of the month to add your photos.
There are more details here.
And one more thing - when you use the link tool, please click on your post title. This will show the web address. Please right click, copy and paste this as your link. This will take readers directly to your '5 in 5' blog page and be easier for them to find.
Thank you to those who have taken part so far, I have loved seeing your photos and hope you will be back with more.
And don't forget, you have until 25th to post your link!